Thursday, January 12, 2012

Elements and Materials in Exhibition Design.

Common materials used for centuries in architectural model building were card stock, balsa woodbasswood and other woods. Modern professional architectural model builders are taking advantage of twenty-first century materials, such as Taskboard, a variety of plastics, wooden and wooden-plastic composites, foams, foam board and urethane compounds.
A number of companies produce ready-made pieces for structural components (e.g. girders, beams), siding, furniture, figures (people), vehicles, trees, bushes and other features which are found in the models. Features such as vehicles, people figurines, trees, street lights and other are called "scenery elements" and serve not only to beautify the model, but also to help the observer to obtain a correct feel of scale and proportions represented by the model.

EXAMPLE OF MATERIALS:


Saturday, January 7, 2012

LESS IS MORE & MORE IS LESS

Less is more mean that do not over do it and shorten or subtler. Less is more effective than more is less because when more is less, we savor nothing while when less is more, it deserve freely and we can think deeply. It also known as the simple and simplicity. Less is more is mean that less work, less stuff, less debt and less stress. Our life will become more time, more benefit, more satifation, more benefit and more balance. Less is more will save time more than the more is less because it work mork effectively and quickly. As a designer, less is more is the mist important element of a design. The lesser the design it is, the more creative it is. While more is less will make the art work more complicated and confuse about the design. 'K.I.S.S is the short form of keep it simple, simplicity'. Less is more might be successful of an individula life.

More is less means more works that be done but the less effective of the work. More is less will wasting the time and energy for doing the works with less output of the work and low quality. I tuink every individual do not like to work more and get liw quality of the work. More is less will make people more stress and unbalance for their lifestyle. More is less bring less benefit to the people who doing it and may bring trouble to them.

In conclusion, less is more ia better than more is less because it work more effectively and create an creative output for a design. Therefore, leas is more is the good choice to choose for doing work. Less work will show the creative of the design and more hardwork.   

Thursday, January 5, 2012

New technology in Environmental Design

Environmental Issues in Design and Technology is part of Key Stage 3 Design and Technology. It is one of a series of topics looking at how moral, cultural, environmental and spiritual issues may influence our work in design and technology.

Environment

Environment means our surroundings.
Our surroundings consist of naturally occurring things like the air, rivers and trees and it consists of things that are built by Humans. We call these two environments:
  • "the natural environment" and the
  • "built environment".

Natural Environment

The natural environment is the naturally occurring surroundings that we live in.
That includes the air, water, hills and mountains, plant life and other naturally occurring things.
The natural environment also includes our climate, i.e. temperature, rainfall, moisture levels, etc.
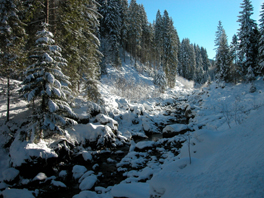
Austrian woodland in snow
We need the natural environment for our survival and for our well being.
Left undisturbed, the natural environment sustains plant and animal life. With a small amount of damage, the natural environment has shown that it can repair itself and return to its former state. Environmental damage on a large scale however, has global consequences and can reach a point where damage is difficult, if not impossible to repair. Air pollution in one country effects others as air currents carry pollutants around the globe. A polluted river contaminates the river bed and life in the river, then as it flows into the sea, it contaminate the sea, the sea bed and sea life. Pollutants may be transmitted through the food chain, poisoning plants and animals in the process.
Environmental pollution can occur:
  • during mining processes when fossil fuels and minerals are dug out of the ground
  • while raw materials are transported to processing plants
  • during processing operations and the conversion of materials into products
  • during transportation and storage of fuels and products
  • during the use of fuels and products
  • when obsolete products and waste materials are transported to recycling plants and waste dumps
  • during recycling processes
  • when dumped waste materials pollute the air, the soil and the water table.
The polluting effects of industry has resulted in air and water pollution, raised acidity levels in rivers, seas and the air, loss of plant and animal habitats, loss of plant and animal species, climate change and a host of other serious effects.
Our unrestrained use of finite resources has resulted in some resources, such as coal and oil, running out in certain areas. Consequently coal, oil and other materials are transported from areas of the world that have them and are prepared to export them.
Protection of our natural environment and our natural resources is so important that the survival of life on Earth depends on it.

Design challenge for the natural environment

The challenge for all involved with design and technology is to design and build products that:
  • people need
  • are safe to use
  • do not pollute the earth or harm the environment in any way
  • do not destroy wildlife habitats
  • do not waste finite resources.

Built Environment

The "built environment" are the buildings and other structures designed and built by Humans.

Inside Buildings and Structures

Internal environments include the environments of personal housing, public buildings, public and personal transport and places of work. These environments are designed to give us the conditions we need to live and work comfortably, i.e. security, warmth, light, clean fresh air and access to food, drink and places for rest and relaxation. The size, shape and colour of these internal environments, together with the materials used in them, their light source, their equipment and facilities, all have effects on our comfort, safety and well being. 
Individual tastes, cultural influences, fashion and the affluence of the accommodation owner/occupier helps to create diversity in the design of internal environments.

External Environments

External environments include the size, shape and layout of buildings, parks, and transport etc.  External environments should be visually pleasing and should enable the community to function properly.  That means that people should be able to move easily and safely from place to place, there should be places where people can do work to earn money, there should be places where they can buy food and household goods and there should be places for relaxation, recreation, sport and education.
Inner city parks such as Central Park in New York can be marvels of design and engineering.  Central Park looks natural but in fact it is carefully planned and crafted, with sophisticated systems that enable it look natural, yet be able to cope with the thousands of people that pass through it every day.
Zoos and wildlife preserves are attempts to create environments where animals can be seen in something resembling their natural habitats. Theme parks are another example of man’s attempts to manipulate the environment for leisure activities.  Others are golf courses, boating lakes, skateboard parks and dry ski slopes.

Transport

The environmental impact of the various transport systems is significant. Road systems are rarely adequate in most European cities.  In cities such as London, there are traffic jams that bring traffic to a standstill. The air pollution from internal combustion engines is endangering people's health and is increasing the levels of green house gases that create global warming and climate change.  Trains today are powered mostly by diesel engines and by electric engines.  Whether the engine pollutes the atmosphere directly or it is the greenhouse gases and other pollutants that are given off from the power stations that produce electricity, one way or another, man’s use of energy pollutes the environment.
The increase in air travel has had many beneficial effects for travellers but the increase in pollution from aircraft has had a detrimental effect on the environment.  Since shipping has stopped using wind as a power source, it too has contributed to air pollution from its engines. Spillages from oil tanker disasters have had devastating effects on the environment.
One of the greatest challenges for scientists and designers is to develop clean sources of energy that can be used for transport and for industry.   

Industry

Industrial practices have also had detrimental effects on the environment, although there have been some attempts at repairing the damage caused by industrial activity. 
Industrial activity has changed our landscape. Quarrying operations have removed hillsides, open cast mining has created massive craters, oil refineries, steel works, power stations and other industrial sites have destroyed the natural beauty of our environment.  From the scarring of the earth during mining excavations, the pollutants released during various processing operations and the dumping of waste products, industrial activity has polluted and scarred our environment.  That is, pollution of the land, sea and air. 

Tuesday, January 3, 2012

Layout Plan

These are the digitize of layout plan. There are layout view, facade view and side elevation. These are the idea of the booth design which just with the line tracing. There will be more details in 3D modelling.


Monday, January 2, 2012

Concept Board and Exhibition Profile

This is the concept board and the exhibition profile. I am using concept of tropical  beach to show the fresh drink of the Marigold product. The exhibition profile of the booth contains 6 area. There are interactive area, cashier, product display, testing area, stage and information board.


About Marigold Product

MARIGOLD has been the leading provider of wholesome and nutritious products for almost 50 years. Our commitment to providing consumers with healthy products to enhance their quality of life is reflected in the corporate slogan 'For Health. For Life'. 

Explore the world of MARIGOLD and discover the wholesome goodness behind every MARIGOLD product!


Wednesday, December 28, 2011

Tutorial on Lighting

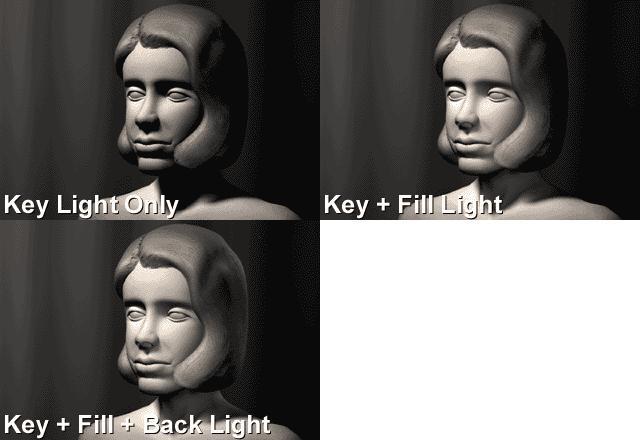
Three lights: the Key LightFill Light, and Rim Light (also called Back Light), are adjusted to achieve the classic Hollywood lighting scheme called three-point lighting.

Three Point Lighting


This GIF Animation shows the role of the 3 lights.


Here's how to set them up in your 3D scenes:
1. Start in Darkness. Make sure there are no default lights, and there's no global ambience. When you add your first light, there should be no other light in the scene.
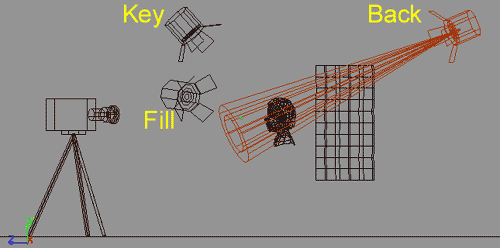
2. Add your Key Light. The Key Light creates the subject's main illumination, and defines the most visible lighting and shadows. Your Key Light represents the dominant light source, such as the sun, a window, or ceiling light - although the Key does not have to be positioned exactly at this source.
Create a spot light to serve as the Key. From the top view, offset the Key Light 15 to 45 degrees to the side (to the left or right) of the camera. From a side view, raise the Key Light above the camera, so that it hits your subject from about 15 to 45 degrees higher than the camera angle.
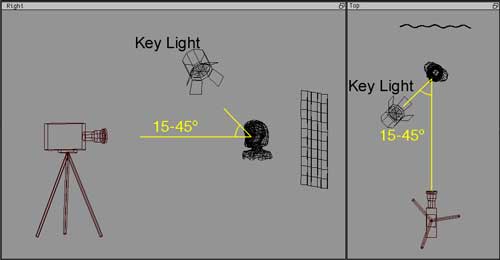

Key Light Postion


The key light is brighter than any other light illuminating the front of the subject, is the main shadow-caster in your scene, and casts the darkest shadows. Specular highlights are triggered by the Key Light.
NOTE: Be sure to stop and do test-renders here. Your "one light" scene (with just the key light) should have a nice balance and contrast between light and dark, and shading that uses all of the grays in between. Your "one light" should look almost like the final rendering, except that the shadows are pitch black and it has very harsh contrast - see the GIF animation at the top of this page, while it only has the Key light visible.
3. Add your Fill Light(s). The Fill Light softens and extends the illumination provided by the key light, and makes more of the subject visible. Fill Light can simulate light from the sky (other than the sun), secondary light sources such as table lamps, or reflected and bounced light in your scene. With several functions for Fill Lights, you may add several of them to a scene. Spot lights are the most useful, but point lights may be used.
From the top view, a Fill Light should come from a generally opposite angle than the Key - if the Key is on the left, the Fill should be on the right - but don't make all of your lighting 100% symmetrical! The Fill can be raised to the subject's height, but should be lower than the Key.


Fill Light Postion

At most, Fill Lights can be about half as bright as your Key (a Key-to-Fill ratio of 2:1). For more shadowy environments, use only 1/8th the Key's brightness (a Key-to-Fill ratio of 8:1). If multiple Fills overlap, their sum still shouldn't compete with the Key.
Shadows from a Fill Light are optional, and often skipped. To simulate reflected light, tint the Fill color to match colors from the environment. Fill Lights are sometimes set to be Diffuse-only (set not to cast specular highlights.)
4. Add Rim Light. The Rim Light (also called Back Light) creates a bright line around the edge of the object, to help visually separate the object from the background.
From the top view, add a spot light, and position it behind your subject, opposite from the camera.  From the right view, position the Back Light above your subject.


Back Light Position

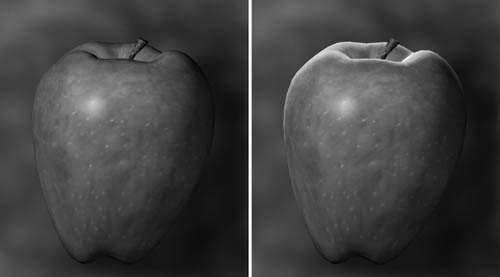
Adjust the Rim Light until it gives you a clear, bright outline that highlights the top or side edge for your subject.  Rim Lights can be as bright as necessary to achieve the glints you want around the hair or sides of your subject. A Rim Light usually needs to cast shadows. Often you will need to use light linking to link rim lights only with the main subject being lit, so that it creates a rim of light around the top or side of your subject, without affecting the background:


Back Light Renderings
No Back Light (left), Back Light added (right).


That's it.  Three-Point Lighting can be a simple starting-point for lighting just about any subject. By walking through it, this tutorial introduced 3 of the main visual functions served by lights in your 3D scenes: Key Light, Fill Light, and Rim Light.  In a more complex scene, there are other types of lights used as well: Practical Lights, Bounce Lights, Kickers, and Specular Lights, which serve other visual functions.  The book Digital Lighting & Rendering goes into much more depth about these.
The vocabulary of describing lights by their visual function is something you can apply in any scene.  However, even when you use Key, Fill, and Rim lights, don't think of three-point lighting as an excuse to light by formula, or to make every scene look the same.  You should begin each scene by looking at what is motivated, by which kinds of light would really be in that particular scene.  There is usually some direction from which the light is brightest, and that is where the Key light should come from.  If the object is back-lit, then there may be a rim, in other cases there isn't one.  It is observing the actual colors, tones, contrast, and direction of real light that actually informs how to create believable scenes in 3D.
While the original first edition of Digital Lighting & Rendering had a chapter focused on Three Point Lighting (which was the inspiration for this tutorial), the new Second Edition de-emphasizes this approach.  Three Point Lighting is still covered in the chapter on Lighting Creatures and Characters, but it is put into a context of understanding the different visual functions of lights that are commonly used in lighting animated characters.  By not presenting it first, hopefully beginning artists won't mistake three point lighting for any kind of a formula or recipe.  If you are trying to create believable lighting that fits with each unique situation, there's no shortcut to skip studying the motivations and qualities of real lights that would occur in a particular scene.