Sunday, October 23, 2011

Information Counter & Information Kiosk

INFORMATION COUNTER
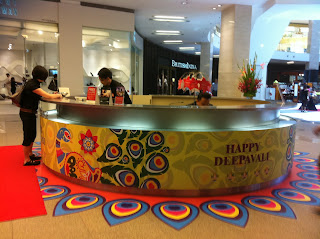
Picture below are the information counter in the Pavilion. It was few days before Deepavali day, so the information decorated as the theme of Deepavali. It is colorful and i think the special part of this information counter is the floor decoration. It surrounded the information counter and the colors are sharp. Besides, the design of the information counter is round and i like the shape of the information counter.


INFORMATION KIOSK
Below pictures are the information kiosk in the Pavilion. The design is vertical in rectangle and it were simple look of the design. The first picture is the main information kiosk of the Pavilion. There are boxes below to put the flyer. The color are balance and mesh perfectly. However, I think that the second picture color balance are not mesh because the background is white and plain. The information kiosk can be improve that not to be in white as the background.


The pictures below are information kiosk in Alamanda. There are too colorful for this information kiosk. I think the purpose of the colorful is to separate the categories of the subject. Anyway, there have a nice boxes to put the flyer. The design of this information kiosk are nice and simple. 


Saturday, October 22, 2011

Introduction To Environmental Design

Environmental Design mean a place based marketing that offers customer experiences in making contact with the brand. Successful environment design is a synergy between a building, landscape, or even a product and surroundings, to the benefit of both. Environmental design applies to outdoor design as well. 

Why Environmental Design
  • Real physically
  • Relatively more spending time
  • Real time activities
  • Immersive experiential
  • Can anticipate all 5 Senses
  • Effective demonstration can be done
  • Product can be tasted/tested
  • Could be one to one communication

Discussion Topic...
  1. Space
  2. Forms
  3. Flows
  4. Print Elements
  5. Screen Elements
  6. Human Elements
  7. Surface Material
  8. Technologies
  9. The Future

Environmental Design

This blog is all about sharing what I learn in Environmental Design class. More details will be updated soon. Do drop by oftenly to check the newest updates. Thanks.

   About ME!
                  ~ Sim Wee Fong
                  ~ 1102701980
                  ~ Beta(2nd semester)

Thursday, April 7, 2011

Assignment 2

Process of Assignment 2

PART  1
First, I open the Adobe Flash CS4 . Then import those images to library. Next, I change the stage size to 240px X 320px.

STEP 1: Use Rectangle Tool to draw a rectangle as the background and black in color.  


STEP 2: Use Text Tool to type the words WE and THE. Then adjust the timeline and convert to symbol. Then  right click and Create Classic Tween to give it some movement.


STEP 3: Use Text Tool type the words Children and Of and drag the Kids image to th stage and place it below Children text. Then  adjust the timeline and convert to symbol. Then  right click and Create Classic Tween to give it some movement. It also adjust the Alpha for the Of text from 0% to 100%.


STEP 4:  Use Text Tool type the word Malaysia. Then at the timeline press F6 in every next frame. Then type the Malaysia text one by one on the keyframe so that it appear the word one by one on the stage.


STEP 5: Drag the Love image form library to stage and convert to symbol. Then right click and Create Classic Tween let the love image appear smaller to bigger on the stage.


STEP 6: Use Text Tool to type the words OUR and COUNTRY. Then adjust the timeline and convert to symbol. Then  right click and Create Classic Tween to give it some movement. Next set Alpha from 0% to 100% so that it appear slowly.


STEP 7: Use Text Tool to type the word Pray For. Then adjust the timeline and convert to symbol. Then  right click and Create Classic Tween to let it appear from bottom to top and give it some movement.


STEP 8: Use Text Tool to type the words Peace& and Prosperity. Then adjust the timeline and convert to symbol. Then  right click and Create Classic Tween to let the peace text appear from left and prosperity text appear from right and also create Alpha to the & text from 0% to 100%.


PART  2

STEP 1: Drag the BuildingMalaysia Text Background and Malaysia Flag image from library to the stage. Convert the Malaysia Flag image to symbol. Then adjust the timeline and right click Create Classic Tween so that can feel the Malaysia Flag movement.


STEP 2: Drag the Kids images to the stage and create a folder for the kids. Covert to Symbol to let the kids rotate left and right.


STEP 3: Drag all the Text images to the stage and create a folder for the text. Convert to Symbol and right click Create Classic Tween to let the text come in the the stage from the left and right. Beside, at Properties there set 100% for the ease so that it appear smoothly when reaching.


STEP 4: Drag the Love image to stage. Convert to Symbol and right click Create Classic Tween to let the love become bigger and smaller repeatedly so that can see the movement of the whole poster.


Final Step: Press F9 and type stop(); then click Script Assist at the end of the timeline. 

 ASSIGNMENT 2 IS DONE 

Wednesday, April 6, 2011

About Assignment 2

This assignment 2 is based on the assignment 1 poster. Duration of the assignment 2 is 15minutes to 20 minutes.

MY CONCEPT OF ASSIGNMENT 2
The theme of assignment 2 is 1 Malaysia. Duration of my assignment 2 is 20 minutes. In this assignment 2, I mostly use CREATE CLASSIC TWEEN, RECTANGLE TOOL and TEXT TOOL. At the timeline, I set it 12fps and end at the 232 frames. I also set the stage size with 240px X 320px that required.